Showing posts with label Tutorials. Show all posts

Tuesday, June 19, 2012

Top 10 Tips For Increasing Blog Traffic - 2012

Increasing blog's traffic is every blogger's aim. Whether for reaching out to a larger audience, or generating more income through a blog, or to create awareness about a particular topic, he needs more traffic on his blog for his efforts to be of any worth. You might spend all the time and hard work you want on your blog. But unless you don't have a decent traffic, all your struggles will be in vain. Hence, the more traffic, the better.

Are you waking up daily, eager to check out your blog's traffic, only to find out that there has been little or no improvement in your stats whatsoever? There must be something you are doing wrong, or not doing at all! Here is a list of things you can do to increase your blog's traffic. Or rather, here is a checklist to help you ensure that you are doing all the necessary things correctly.

Post frequency and Timings
Post frequency and timings are extremely important for your blog's rankings. First of all, search engines such as Google like to see fresh content on websites. If your blog is struggling for traffic, then you must publish at least one post daily. The more frequently you publish posts, the more quickly your rankings and traffic grows. For example, our other blog SEM had a million+ Alexa ranking when it started! We have been publishing two posts daily for the first two months. And in those two months, the Alexa improved dramatically and it now stands at around 50,000!

post timings
Post timings are important as well. Not only do you need to be consistent in your timings, you should also choose a time that's globally significant. Choose a time windows that best suits your majority audience. Our publish timings are 12 01 am each day! Not only does this suits our audience, it also is consistent timing. Once you choose a time, stick to it! Not publishing posts on your fixed time can drop your Alexa! This is what happened to me at SEM once or twice. I made a mistake in scheduling my post, and it didn't publish at the set time. As a result, the Alexa didn't improve, despite the two brand new posts published that day!

Build Backlinks

Backlinks are very important for a blog, but only the quality ones. Backlinks refer to in-bound links to your blog from other sites. Backlinks give you instant traffic from other sites. But be careful about them. Trust me, you don't want cheap backlinks to your blog. They will hurt your rank instead of improving it. Never buy a backlink package such as "1,000 backlinks for $9.99" etc. Try to build genuine backlinks on sites with a decent rank.
High ranking backlinks

How to build backlinks? Well there are many ways. Participate in forum discussions, and recommend some content on your blog to others. Also add your blog's URL to your signatures. This will leave a link to your blog each time you post a comment on a forum. Another way of increasing backlinks is by guest posting on other blogs. Write for other blogs in return for backlinks.
Advertise!
If you've got some money on hand, then why not advertise your website? Advertising your blog is one of the best ways of increasing traffic, since it gives you instant exposure. Ads on sites relating to your niche can give you much more benefits as compared to other sites, since the traffic on similar niche sites is interested in exactly the kind of stuff you, or other similar sites have.
Interact!
Interacting with your audience is the key to retaining and increasing your traffic. Adding stuff like polls, questions, surveys and forums can increase your interactivity. Also, use such a writing style that addresses the readers directly. Be casual and friendly, and don't be (too) formal.
Write Articles
This method is highly effective. Not only does it give you immediate traffic, it also gives you  quality backlinks that improve your traffic in the long run. Write an article on a topic relating to your website, and submit it to popular article directories, such as Squidoo, Hubpages, Ezine Articles etc. For example, say you have a blog about affiliate marketing. You can write an article on affiliate marketing tips, and then mention your own blog in that article. Then submit that article to popular directories for traffic and backlinks.

write articles

One thing though. Try not to write on sites that give no-follow links. Such sites include eHow, articlesbase, examiner etc. Sites like Squidoo and Ezine Articles don't give no-follow links, which is preferable.
Discuss Recent Trends

Discussing hot topics can get you in search engines' good favour. Google likes to see the latest content. Not only that, people also want to see latest content. Discussing latest topics gives a good impression of your blog being up to date. Not only that, it draws a lot of traffic, and indeed contributes a lot towards this very blog's traffic.

Guest Blogging


Encourage guest posting on your blog. There are many advantages of doing that. First of all, it will increase your post frequency, which, as we already discussed is a good thing. It will also reduce your workload and effort. Secondly, it will increase your traffic slightly, since fans from the guest's blog will want to read what their writer has written on another blog. Be careful about this though. You have to give out backlinks to the guests' blogs. Too many out going links without a nofollow attribute and your rank will start to drop!

Guest blogging

Apart from inviting people to write for you, you can write for others as well. This will get you a backlink. Write multiple posts on quality blogs, and you will see your backlinks increase and your rankings soar! This is one of the best way of building genuine backlinks

Apply SEO techniques


Search Engine Optimization is so vast a topic that entire books have been written on it. But you don't need to read books. All you need do is learn some basic SEO techniques, and apply them to your blog. SEO is extremely important if you want search engines to find your blog easily.

You should be familiar with the most basic SEO methods. Keep keywords in mind while writing titles and introductory paragraphs. Also write two or three line meta descriptions for your posts. If you are using WordPress, then you'll need to add meta keywords as well. Complete these basic steps and you're done with the basic SEO, although this is, by no means, the end of it.

SEO

Also, learn how to generate and submit a sitemap for your blog to major search engines. This is an important SEO step that every blogger needs to take to ensure that all of his posts and pages are indexed properly.
Use Social Media
You'll be surprised at how useful social media can be. Make public profiles on popular networks such as Facebook, Twitter and Google+ etc. These will help you build a fan base of your blog. Social Media is also great in the sense that it provides you a much greater exposure through your fans than you could get on your own. So share your new blog posts on social media not only to gain extra traffic, but also to retain your existing traffic.

Use Q&A Websites


Q&A websites can be a great source of traffic for blogs. Get active on popular Q&A sites, such as Yahoo! Answers, Wiki Answers etc. Search for questions related to your area of expertise, and answer them. Then provide your website link as a source. For example, if you are an affiliate marketer, answer some questions regarding the field, and answer them well. Then give the link to your blog. You can also do this on popular forums such as Blogger Forum etc.

Q&A Websites
These were some of the tips for increasing blog traffic. These are, by no means, the only ways. There are literally thousands of ways you can increase your blog traffic. But hopefully, these basic tips will guide you in building your basic audience.

Friday, June 15, 2012

How To Get Free .com Domain Under Yourname.com


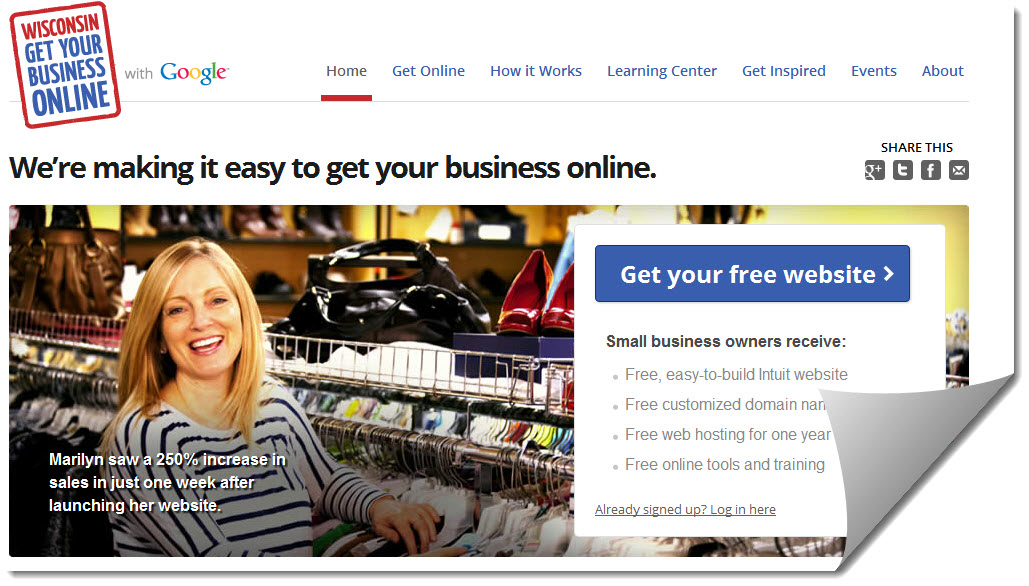
Recently Google have launched Wisconsin Get Your Business Online Program . Wisconsin Get Your Business Online is designed to make it easy, free and fast for any business to get online. Any small business program with small and limited resources and products can now get their business online with the world within few minutes for free. Yes you got it right , you are going to bring your business online for free.
You don’t have to pay anything for this. It is provided by Google. Google partnered with Intuit Company, the Association of Small Business Development Centers, SCORE, and Meetup and they are hosting for free to help small business owners to to get started with their own basic .com website. The project is launched as WisconsinGetOnline (Wisconsin Get Your Business Online). This is a free program from Google. You can get signup for it from any country and get your business online easily and fast.
They are providing following things with free.com domain :
  • Free, easy-to-build Intuit website
  • Free customized domain name
  • Free web hosting for one year
  • Free online tools and training
  • A free customized domain name and hosting
  • $75 in Google AdWords credit
After reading about information and the features provided by it , you might be interested to get your own free.com domain. So now I am going to show you how to get your .com domain for free.  Let’s begin the process.

Easy way to get Free .com Domain name registration for 1 year :

  • At first you need to Go to Wisconsin homepage via this link and there you need to click on GET YOUR FREE WEBSITE button.
  • Now you need to Sign up for your free Intuit website. Then you will get following screen.
Free Intuit Website

  • If you have Google account then you can sign in with it else sign up for a Google account and then sign in with that account.
  • Allow access to it and then click on Continue button.
  • Next you need to you intuit websites password. Fill the details and accept term and conditions and click on continue button.
Domain for Free


  • Then you will be redirected to Intuit Website to register a free .com domain name. Click continue as shown in the above screenshot. Then you will get the following screen.
Getting started


It contains three steps. Select first one i.e – Choose a domain (www.yourname.com) for your website. You will get the following screen. If you are not sure, what domain name you should buy, I suggest you to read how to select great domain name for business & 5 domain name suggestion tools.
 Get a Free Domain Name

 Since you are registering a new domain name so , make sure that the domain name you are going to register is available. You can do this by entering your desired domain name under “Get a New Domain” and clicking on Check Availability  button. If it is available then you will be presented with following screen.
 Domain center

Now all you need to do it click on Get Domain button. Then you will be asked to enter your contact information as shown in the belwo screenshot.


domain contact Info

Enter your contact information and click on Save & Continue button. Then you will be ask to review your information. Review it , agree to the terms of service and  click on submit button.  Note : You must uncheck the Yes (Recommended) option for domain privacy because if you check it you have to pay $1 per month.
As soon as you submit it for review you will get a pop up page asking for your Billing Information. They are asking this to protect against fraudulent activities. Though your website and .com domain name are free but they still need your billing information. Enter your address details and debit/credit card information in this page. Now the real problem comes. Many of us don’t have a real debit/credit card, so to solve this problem you need to create a virtual visa credit card. You can create a virtual visa from Entropay.com. Note : You can also use other websites to create virtual visa. If you don’t want to create virtual visa then use the following virtual visa details to fill the payment options and you will be able to purchase your domain for free.
  • Name on card : Jackie Chan
  • Card type : Visa
  • Credit card number : 4067424695632061
  • Expiration date : 12-2012
  • Card security number : 279
 Test Credit Card

Now just enter your virtual visa details in the payment page and click on purchase button. Now you have successfully created your website with a free .com domain name registration. It may take an hour to activate. After it is activated, you can use their website builder to create a new website or just change the name servers by going in the domain manager to use with other webhost.
I hope this tip would help you to save some money and increase your online presence. If you find this post useful, don’t forget to share it on Google plus and Facebook.

Wednesday, June 13, 2012

Add A Comment Bubble Just Next To Blogger Post Titles


If you want to show the number of comments just next to your blog post tiles then comment-bubble is a best way to show number of comments to that particular post in a small bubble icon.This little bubble will also increase the number of comments on your blog,because by clicking on the bubble your readers can directly access the comment-form of that post.Also you can add this in two easiest ways,just follow below steps carefully and you will easily add this to your blog.


How To Add Comment Bubble Just Next To Post Title?


  1. Go to Blogger Dashboard > Template
  2. Take a backup of your template
  3. Click On Edit HTML
  4. Hit Proceed
  5. Check Expand Widget Templates chechbox.
  6. Find below code in your template

]]></b:skin>


add below code just above it

.comment-bubble {
float: right;
width: 48px;
height: 48px;
background: url(https://blogger.googleusercontent.com/img/b/R29vZ2xl/AVvXsEjJqDVhpKpjlE7WXqm-9i_ctNW7Fr3WfbtcoVHil4OJDz6dw6WFayEqJl7E6lCnlIqFM-VlbfMiUjbljHVwnQllKmuNCxqUCGuaomZark2K_4K14JpbfGyPQ-knMzOQ8AGoVvnqCnrS3LEh/s1600/helperblogger.com-commentbubble.png) no-repeat;
font-size: 18px;
float: right;
margin-top: -15px;
margin-right: 2px;
text-align: center;
position: float;
text-align: center;
}


Now find for below code in your template

<b:if cond='data:post.link'>


replace it with below piece of code,

<b:if cond='data:post.allowComments'>
<a class='comment-bubble' expr:href='data:post.addCommentUrl' expr:onclick='data:post.addCommentOnclick'><data:post.numComments/></a>
</b:if>
<b:if cond='data:post.link'>

Now take a preview of your template,if you want to adjust the position of comment bubble then you can change the above CSS values as you need.When you feel that everything is ok then save your template.You can also replace the bubble with your own bubble,just replace the URL of bubble with your own bubble URL.

Add Image Just Next To Blogger Post Titles

In this post we are sharing a cool hack which will add an your own image,favicon or whatever you choose just next to your blog's post titles.You can also add your own profile pic. it will give more personal touch to your blog.To apply this hack you just have to delete and put some code in your template.If you want to see live preview of the hack,then see the image below,


Now lets see how to apply this hack,


How To Add Image Just Next To Blogger Post Titles?


I have tried my best to keep this tutorial easy as easy as possible.For better understanding I am dividing this tutorial in three parts,but you just have to follow any one post because it depends upon the tag which you are using as post title.

  • Part 1: Finding the tag which you are using as Post Title
  • Part 2: For those who are using H3 tag as a Post Title
  • Part 2: For those who are using H2 tag as a Post Title


Part 1: Finding the tag which you are using as Post Title


  1. First go to Blogger Dashboard > Template
  2. Download a copy of your template
  3. Click Edit HTML
  4. Hit Proceed
  5. Check Expand Widget Template checkbox
  6. Find below code in your template


1
<h3 class='post-title entry-title'>

Now if you found above code in your template then you are using H3 tag as a post title.Now only follow second part of this tutorial

If you can't find above code then find for this one

1
<h2 class='post-title entry-title'>

If you found above code in your template then you are using H2 tag as a post title.Now only follow third part of this tutorial.

Part 2: For those who are using H3 tag as a Post Title


  1. First go to Blogger Dashboard > Template
  2. Click Edit HTML
  3. Hit Proceed
  4. Check Expand Widget Template checkbox
  5. Find below piece of code in your template


1
2
3
4
5
6
7
8
9
10
11
12
13
14
15
16
17
18
19
20
<b:includable id='post' var='post'>
  <div class='post hentry'>
    <a expr:name='data:post.id'/>
    <b:if cond='data:post.title'>
      <h3 class='post-title entry-title'>
      <b:if cond='data:post.link'>
        <a expr:href='data:post.link'><data:post.title/></a>
      <b:else/>
        <b:if cond='data:post.url'>
          <b:if cond='data:blog.url != data:post.url'>
            <a expr:href='data:post.url'><data:post.title/></a>
          <b:else/>
            <data:post.title/>
          </b:if>
        <b:else/>
          <data:post.title/>
        </b:if>
      </b:if>
      </h3>
    </b:if>

replace it with below code, (be careful while deleting,only replace above exact code)

1
2
3
4
5
6
7
8
9
10
11
12
13
14
15
16
17
18
19
20
21
22
23
24
25
26
27
28
29
30
<b:includable id='post' var='post'>
  <div class='post hentry'>
    <a expr:name='data:post.id'/>
    <b:if cond='data:post.title'>
    <table><tr>
     <td class='ssybyposttitle'>
      <img src='https://blogger.googleusercontent.com/img/b/R29vZ2xl/AVvXsEjKLcPTGM_GucEpZgGsEpUO4d3qAxrwXMrmNDpZdCmbksBH-9k7yHGOU6EDgjztDGxoCMNt9hRqQPl4NJdgn0RVBBFzua3bTHXr2LXQZqWqPtaIXabyk8TJk6RzYG8g8YyaF6esTb7nkg0/s1600/helperblogger-pencil.png'/></td>
     <td><h3 class='post-title entry-title'>
      <b:if cond='data:post.link'>
        <a expr:href='data:post.link'><data:post.title/></a>
      <b:else/>
        <b:if cond='data:post.url'>
          <b:if cond='data:blog.url != data:post.url'>
            <a expr:href='data:post.url'><data:post.title/></a>
          <b:else/>
            <data:post.title/>
          </b:if>
        <b:else/>
          <data:post.title/>
        </b:if>
      </b:if>
      </h3>
     </td>
    </tr></table>
     <style>
       h3.post-title {
       margin: 0px !important;
       }
     </style>
    </b:if>

Now replace the image URL in above highlighted line with your own image URL (image should be less than 64X64 pixels)

Part 3: For those who are using H2 tag as a Post Title


  1. First go to Blogger Dashboard > Template
  2. Click Edit HTML
  3. Hit Proceed
  4. Check Expand Widget Template checkbox
  5. Find below piece of code in your template


1
2
3
4
5
6
7
8
9
10
11
12
13
14
15
16
17
18
19
20
<b:includable id='post' var='post'>
  <div class='post hentry'>
    <a expr:name='data:post.id'/>
    <b:if cond='data:post.title'>
      <h2 class='post-title entry-title'>
      <b:if cond='data:post.link'>
        <a expr:href='data:post.link'><data:post.title/></a>
      <b:else/>
        <b:if cond='data:post.url'>
          <b:if cond='data:blog.url != data:post.url'>
            <a expr:href='data:post.url'><data:post.title/></a>
          <b:else/>
            <data:post.title/>
          </b:if>
        <b:else/>
          <data:post.title/>
        </b:if>
      </b:if>
      </h2>
    </b:if>

replace it with below piece of code,

1
2
3
4
5
6
7
8
9
10
11
12
13
14
15
16
17
18
19
20
21
22
23
24
25
26
27
28
29
30
<b:includable id='post' var='post'>
  <div class='post hentry'>
    <a expr:name='data:post.id'/>
    <b:if cond='data:post.title'>
    <table><tr>
     <td class='ssybyposttitle'>
      <img src='https://blogger.googleusercontent.com/img/b/R29vZ2xl/AVvXsEjKLcPTGM_GucEpZgGsEpUO4d3qAxrwXMrmNDpZdCmbksBH-9k7yHGOU6EDgjztDGxoCMNt9hRqQPl4NJdgn0RVBBFzua3bTHXr2LXQZqWqPtaIXabyk8TJk6RzYG8g8YyaF6esTb7nkg0/s1600/helperblogger-pencil.png'/></td>
     <td><h2 class='post-title entry-title'>
      <b:if cond='data:post.link'>
        <a expr:href='data:post.link'><data:post.title/></a>
      <b:else/>
        <b:if cond='data:post.url'>
          <b:if cond='data:blog.url != data:post.url'>
            <a expr:href='data:post.url'><data:post.title/></a>
          <b:else/>
            <data:post.title/>
          </b:if>
        <b:else/>
          <data:post.title/>
        </b:if>
      </b:if>
      </h2>
     </td>
    </tr></table>
     <style>
       h2.post-title {
       margin: 0px !important;
       }
     </style>
    </b:if>

Now replace the image URL in above highlighted line with your own image URL (image should be less than 64X64 pixels)

Wednesday, June 6, 2012

How to Create a Horizontal Dropdown Menu with HTML, CSS and jQuery


Menus play an essential part on the web. They allow users to find their bearings and help them navigate your website. When designing menus, usability is the key.

Beginners often struggle with the basics. In this tutorial I'm going to show you how to create a simple, usable and functional horizontal menu with HTML and CSS. I will also dive a little bit into jQuery to add animations to your menu.


Basics

Let's start with the basic HTML structure of the menu:
1
2
3
4
5
6
7
<ul id="coolMenu">
<li><a href="#">Lorem</a></li>
<li><a href="#">Mauricii</a></li>
<li><a href="#">Periher</a></li>
<li><a href="#">Tyrio</a></li>
<li><a href="#">Quicumque</a></li>
</ul>
A menu consists of an unordered list, and each list item contains a link with the text. Don’t create unnecessary divs. You don’t need any.
To add a sub menu simply nest another unordered list inside the item that's going to have the sub menu, like this:
1
2
3
4
5
6
7
8
9
10
11
12
13
14
<ul id="coolMenu">
    <li><a href="#">Lorem</a></li>
    <li><a href="#">Mauricii</a></li>
    <li>
        <a href="#">Periher</a>
        <ul>
            <li><a href="#">Hellenico</a></li>
            <li><a href="#">Genere</a></li>
            <li><a href="#">Indulgentia</a></li>
        </ul>
    </li>
    <li><a href="#">Tyrio</a></li>
    <li><a href="#">Quicumque</a></li>
</ul>

As you can see, creating the structure is very simple. This is how it should look in your browser at this stage:
Stage 1
There are multiple ways to set up the CSS for a horizontal menu. After many years I found that this is the quickest and cleanest way to do it:
1
2
3
4
5
6
7
8
9
10
11
12
13
14
15
16
17
18
19
20
21
22
23
24
25
26
27
28
#coolMenu,
#coolMenu ul {
    list-style: none;
}
#coolMenu {
    float: left;
}
#coolMenu > li {
    float: left;
}
#coolMenu li a {
display: block;
    height: 2em;
    line-height: 2em;
    padding: 0 1.5em;
    text-decoration: none;
}
#coolMenu ul {
    position: absolute;
    display: none;
z-index: 999;
}
#coolMenu ul li a {
    width: 80px;
}
#coolMenu li:hover ul {
    display: block;
}
  • I decided to float the whole menu to contain it but you can use overflow hidden or even set a fixed width for the same purpose.
  • It is important to float the list elements rather than the links.
  • The links should be displayed as blocks, otherwise, they won’t behave as expected.
  • Absolute position the submenu and hide it to remove it from the regular flow and make it invisible. Also, set a high z-index to prevent the submenu from showing behind other elements.
  • Set a height for the link elements and the line-height equal to the height to center the text vertically. By specifying a fixed height instead of just using padding you avoid flickering problems with jQuery animations later on.
  • Even though it’s not necessary to set a fixed width for the submenu items, it’s always a good practice. It allows you to style them more consistently later on.
  • Notice that the hover state is set on the list element and not the link.
With all this set, the menu should be already working. Try opening it in your browser and hovering over the third option to show the sub menu.
Stage 2

Improving Usability

This step will cover how to style the menu with some basic CSS to make it more accessible.
1   /* Main menu
2   -------------------------*/
3   #coolMenu {
4   font-family: Arial;
5   font-size: 12px;
6   background: #2f8be8;
7      }
8      #coolMenu > li > a {
9   color: #fff;
10  font-weight: bold;
11    }
12    #coolMenu > li:hover > a {
13    background: #f09d28;
14    color: #000;
15    }
16    /*
17    Submenu
18    ------------------------------------------*/
19    #coolMenu ul {
20    }  
21    #coolMenu ul li a {
22    }
23    #coolMenu ul li:hover a {
24     background: #ffc97c;
25     }


Keep in mind this is very basic, and is meant to be just an example. You can style this however you want. The important thing to remember here is, as I mentioned before that the hover states, are styled in the list items and not the links.
This is how the menu looks so far:
Stage 3

Adding Animations

This final step is not necessary but it’ll help you add animations to your menu with simple jQuery. The first thing you need to do, of course, is to call the latest jQuery plugin on your website:
1
<script type="text/javascript" src="http://ajax.googleapis.com/ajax/libs/jquery/1.6.1/jquery.min.js"></script>
Now, let’s add a "noJS" class to the submenu to be able to unhook the hover css state in jQuery. This will also ensure that the menu will still work when javascript is disabled.
1
2
3
4
5
6
7
8
 <li>
    <a href="#">Periher</a>
    <ul class="noJS">
        <li><a href="#">Hellenico</a></li>
        <li><a href="#">Genere</a></li>
        <li><a href="#">Indulgentia</a></li>
    </ul>
 </li>
You also need to add the class to the sub menu CSS hover state:

1 #coolMenu li:hover ul.noJS {
2 display: block;
3 } 
Now that everything is set let’s add some magic:

1
2
3
4
5
6
     

$(function(){
$('#coolMenu').find('> li').hover(function(){
        $(this).find('ul')
        .removeClass('noJS')
        .stop(true, true).slideToggle('fast');
    });
});
The code is pretty explanatory. The script finds the immediate children list items and adds a hover function. Inside the function it removes the "noJS" class since we’re using JavaScript, and then it tells the menu to slide down on hover and to slide up on un-hover. This is achieved with the slideToggle function. The stop function prevents the animation from repeating itself if we hover multiple times.